Top Backpacking Tents of 2016

So you’re ready for some backpacking, and want to start with the basics.  Or maybe you’re experienced and looking for some new gear for that new trip you have lined up.  Having a top notch tent in your pack is one of the best ways to increase comfort, enjoyment and safety on backcountry trips.  But when you are starting to look for your new tent, you will find there are A LOT of options out there.  Trying to find the tent that fits your needs can quickly become overwhelming.

I’m kind of a gear-head.  I love my research.  And having thru-hiked the Appalachian Trail and many other trails, I have the opportunity of knowing THE BEST people to ask when it comes to gear selection.  Not only that, but during my own hiking experiences, I’ve researched and tested, got referred to many various backpacking tents, and narrowed them down to the very best of the best.  Weight, cost, interior space, and weather protection are all factors in my choices.

I hope this post helps you find the best tent to suit your needs, keeping you warm, dry and protected in the outdoors for many years to come!

IMG_4101Shwayzes Gear Guide: Tents.

Tent considerations

Cost – Cost is one of the biggest concerns for most people.  You shouldn’t have to pay a small fortune for a tent.  However, as most of you know, a little more money spent on a quality product protects you from various and unforseen setbacks encountered.  Preparation is key.

Weight – A few ounces here and there seem like nothing before the trip.  However, they add up and become consequential when you experience fatigue, knee pain, etc.  Keeping your pack light is the #1 priority to stay healthy on long trips.  I have seen too many injuries due to heavy packs in my time.  To me, weight is critical.  As one of the big 3 (heaviest items in your pack – tent, sleeping bag, sleeping pad), it’s essential to keep weight to a minimum with these items.

Protection – A backpacking tent that doesn’t protect you against mothernature is just dangerous.  I backpacked with a couple that bought a $40 tent, and when the temperature dropped, they suffered.  They also didn’t fair so well during rainstorms either.  Be careful with extreme budget tents.  Every tent on this list will keep you well protected from the elements.

Season Rating – Where are you hiking and how long?  What kind of conditions are you expecting.  Expect the unexpected.  3 season tents are the most popular, built for spring summer and fall trips.  I’ve survived some winter hiking with my 3 season, when it dropped down to 13 degrees at night with some wind.  I had a great sleeping bag, but that’s a different list.  A good 3 season tent will have you isolated from bad weather, while still promoting air circulation on those hotter days.

Interior Space – Comfort, really.  If you’re 6′ 3″ and your feet are touching against the end of the tent, you’re going to get wet.  Including your sleeping bag.  This is important to strike a balance between comfort and weight.  I have chosen tents that maximize interior space, while keeping weight at a minimum.  I like a spacious light weight tent, so I carry a 2p.  If you are willing to carry a little extra weight, consider bumping up a size.

Capacity – How many people will you be traveling with?  2 person tents are the most popular, and for good reason.  With recent tech designs and innovations, tent weight has been decreasing drastically, allowing a single person to carry a 2 person tent.  There is not much difference in weight between a 1p and 2p tent.  Group tents are heavier and less practical, and more meant for car camping.  However, there are some good options I have listed in another section.

Durability – Light weight tents tend to be less durable than heavy weight tents.  However, unless you are really rough with your gear, the tents I have provided in this list will last you many years, and thousands of miles.  My current tent has lasted around 3000 trail miles, and there is absolutely nothing wrong with it.  Flawless.  My experience and research have shown me that if you treat a light weight tent well enough, they will last you thousands of miles, many more miles than the average backpacker.  My professional opinion is to stick with the light weight tents.

Wall Construction – This gets a little too specific, but is important.  Double wall tents come with 2 separate walls, the tent itself, and a rainfly.  The advantage to this is that condensation will stay off the mesh inner wall, and stick to the rainfly.  The other advantage is simply airflow on a cloudless night.  Keep it on to stay warm, take it off when it is hot.  Single wall tents have a built in rainfly, saving a little weight, and promote airflow to keep condensation down.  However, condensation is inevitable, and when your sleeping bag gets soaked because of it, your next day is going to be rough.  My opinion is to stick with a double wall tent.

Doors/Vestibule Space – Having 2 doors is helpful when 2 people are sharing a tent.  As well as 2 vestibules.  A vestibule is the space under the rainfly, between the tent and the rainfly, that you can keep gear in to prevent from getting wet, but also don’t have to cram into your tent.  Vestibule space is very important to me.  The tents I have listed are proven to fit all your needs, and are quite spacious.

Set up – Freestanding tents have the ability to be pitched anywhere, pop up tents are a synonym.  They can be anchored down with stakes, and even into rock.  These are generally preferred due to ease of set up, and how quick they can be set up and broken down.  Non-freestanding tents use trekking poles or other methods to pop the tent up.  They save weight by not needing tent poles, instead using line, trekking poles, or stakes.  These are a little more time consuming, but I have met some hikers that absolutely love them.  The weight is a huge plus for these.  My preferred tent is a freestanding pop up tent.

Footprint – A footprint weighs next to nothing, and is what interferes with the ground touching the bottom of your tent.  It is extra weight, but will protect your tent from abrasions, rocks etc.  These are sometimes not included in tents, but are worth the purchase, and will be sold as an accessory to the tent.  I recommend footprints just due to how grimy the ground can get.

Buy Online – Although I prefer to buy online because I can shop around for the cheapest deal, not all do.  Check the sellers status before making a purchase, and ask about their return policy.  If you are unsatisfied with your purchase, simply return to the seller.  BUT, the advantage to this, is you are able to purchase the tent, and try it out on your own, before making the decision to keep it.  I’ve purchased my tents online, haven’t had problems and always have ended up keeping them.  But not before doing my diligent research.

img_5805

Best Backpacking Tents of 2016

MSR Hubba Hubba Nx

Weight3 lb. 7 oz.

Dimensions:  84″x 50″ floor, 39″ height

Design:  2 person, 3 season, freestanding, 2 doors, 2 vestibules, double wall.

Features:  Set up and take down is made easier with a color coded hub and pole system.  Two large StayDry™ doors ensure water does not drip into tent while doors are open (I never tried this during a real rain storm).

Uses:  Ultralight backpacking, Backpacking, Camping

A very popular item among ultralight backpackers for a long time, this tent is partial to me, because I carried it with me as I thru-hiked the entire Appalachian Trail (2185.3 miles).  I STILL have it.  A rectangular floor and symmetrical shape allows hikers to spread out on opposite ends.  The vertical side walls and end walls help maximize the interior.  It is super easy to set up and take down, the vents help stay cool on hot nights, and the rain fly provides maximum protection against the elements.  Although it is a bit heavier than other tents I have listed, the durability, design and popularity puts it on this list.

Accessories:  I recommend picking up the MSR Hubba Hubba Nx footprint to increase durability.  The tent is available in different sizes, the Hubba Nx 1p, Motha Hubba Nx 3p, and the Papa Hubba Nx 4p.

Big Agnes Copper Spur UL2      

Weight:  2 lb. 13 oz.  Fast Fly Weight:  2 lb. 1 oz.

Dimensions:  Floor – 29 sq. ft. – 90″ x 52″/42″.  (Wider at head, narrower by feet).  Vestibule – 9 + 9 sq. ft.  Height – 42″.

Design: 2 person, 3 season, freestanding, 2 doors, 2 vestibules, double wall.

Features:  2 doors and 2 vestibules with 18 sq. ft. of vestibule space!  A crossover pole for extra headroom.  Double twisted thread for durability.  All seams are sealed with waterproof, solvent-free polyurethane tape.

Uses:  Long distance backpacking trips, ultralight backpacking, camping, section hiking, weekend warrior

The Big Agnes Copper Spur UL2 packs a solid punch for such light weight.  Although light in weight, it has double twisted thread for extra strength and durability.  Opposing mesh doors provide good ventilation, while allowing 2 people easy access to the tent.  A spacious accommodation for 1 person, but sleeps two in a pinch.  A good friend thru-hiked the Appalachian trail with this, and highly recommended this tent.  It has built in mesh pockets for your gear.

Accessories:  I recommend the Big Agnes Spur UL2 Footprint for extra durability.   This tent also comes in a 1 person UL1  (2 lb. 3 oz.), a 3 person UL3 (3 lb. 11 0z.), and the four person UL4.

Nemo Hornet 2p Tent               

Weight: 2 lb.

Dimensions: Floor – 28 sq. ft.  85″ x 51/43″ (Larger at head, than at foot).  Height – 40″.  Vestibule space – 8 sq ft. x 8 sq ft.

Design: 2 person, 3 season, freestanding, 2 doors, 2 vestibules, double wall.

Features:  Large side doors, a good amount of vestibule space, offers easy access in and out of tent.  Extremely fast and easy set up, thanks to single hubbed pole, with ball and socket tips.  Tech:  Durable, featherlite NFL aluminum poles weigh less than nearly all poles on market.

Uses:  Ultralight backpacking, Thru-hiking, Long distance hiking, Backpacking, Camping.

The Nemo Hornet 2p Tent is one of the lightest freestanding tents on the market.  This is due to the technology used in its design.  Light weight, yet still quite durable.  The downside is less headroom than some of the other tents, but the plus side is it is a lot lighter, making this one of the top tents on the market.  A couple more ounces than its 1p. version, but with an extra door and extra space, it is well worth the upgrade.

Accessories:  I recommend picking up the Nemo Hornet 2p Footprint for extra durability. This is also available in a smaller Nemo Hornet 1P tent.


ZPacks Duplex                  ultralight-two-person-tent-duplex-angle_l

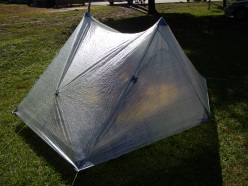
Weight:  1 lb. 5 oz.  (without poles)

Dimensions:  Floor – 90″ x 45″.  Height – 48″.  Vestibule space – 20.75″ on each side.

Design:  2 person, 3 season, 2 doors, 2 vestibules, single wall, 2 trekking poles and 6 stakes min. for setup.

Features:  Set up with two trekking poles to a peak height of 48″.  4 storm doors.  Tarp overhangs floor by 4-5 inches on each side to prevent water from dripping onto floor.

Uses:  Ultralight backpacking, long distance backpacking, backpacking, camping.

Immerse yourself in beauty as the seasons change

15 miles north of Flagstaff, on the Scenic Highway 180, you will find a dirt road called Hart Prairie Road.  This is one of the most rewarding roads to view the white aspens as they change their colors in October.  Easily one of my favorite scenic drives, I had the opportunity to visit recently and wanted to share with you all.

This takes place in Flagstaff, Arizona which is located 7000 ft above sea level.  The city boasts an impressive 12,600 ft. Mt. Humphreys that can be seen in the distance.  As you approach this mountain on the highway 180 north, you will begin to catch glimpses.  Trail off onto Hart Prairie Road after about 12 miles outside of town (hook a right) and follow as far as your heart desires.  You will soon be immersed in beauty.

img_7724img_7731img_7732img_7733img_7734img_7735img_7737img_7738img_7741

Hiking the Fundy Footpath

Before you start planning, make a gear list!  I have mine accessible at this link.  This is the gear list I had for the Appalachian Thru-hike I completed, and my gear does not deviate much from it.  I would not bring the cold weather gear, as it is not applicable on the Fundy Coast.

Gear page

01_ATgear_olivier_750x400

Hiking the Fundy Footpath is beautiful, remote, challenging, and inspiring.  But above all else, it’s an adventure!  I did a ton of research before setting out on this one, and I have written most of my findings.  The Getting prepared section has some brief information.

745_403_footpath_map_2009b

Maps can be purchased through this link – http://www.fundytrailparkway.com/en/the_fundy_footpath/ 

*Hint (Literally call them and request one, contact information under “contact us”).  If you are feeling ambitious, you may also ask them about taxis, I have a couple listed under Day 1.

Getting prepared

Day 1 has all the information about where we got our maps, who we picked to take for our taxi and a way to reach them, where to park etc.  People usually leave their car at Point Wolfe Campground which is 8 km from the start (or end) of the trail.  We left our car there and taxid to the other terminus (Big Salmon River).

Day 1 – Big Salmon River to Little Salmon River 17.9 km (11.12 miles)

p1040098

After realizing this hike was a little more challenging than originally anticipated, which is fine for me, I had a minor melt down on day 2.  We hiked only 10 miles, but that literally took 10 hours.  I haven’t hiked that slow in God knows how long, but what a day!  There are shots of the trail and images of the map in day 2.

Day 2 – Little Salmon River to Goose Creek campsite – 16.1 km of hell (10 miles)

Day 3 we were pretty much wiped, and finished the trail by 10 am.  2 days and 4 hours.  Not bad!  But the real reason we hurried on day 3 was hunger and the thought of hot food and all those lobster rolls all around the area.  New Brunswick has some AMAZING seafood.

This section also has some information and pictures regarding finding the end of the trail, as you cross Goose River, crossing over into the approach trail.  They don’t exactly interconnect immediately, and you may want to read about it before hand.  The map wasn’t exactly informative.

Day 3 – Goose Creek Campsite to Goose River (ending) to Point Wolfe Parking Lot – 15.3 km (9.5 miles)

Afterwards, we opted out of the immediate hot showers available at Point Wolfe Campground, and instead traveled to Alma 5 minutes away.  Alma is a quiet little touristy town chalk full of seafood. Here is some info on Alma, although I found asking locals was the best way to get what I wanted.

http://www.tourismnewbrunswick.ca/Products/V/Village-of-Alma.aspx

Fundy Footpath – Day 3

Looking to go on an adventure?  Get the gear first!

Visit my gear page here for questions about gear.

1313902.large

Goose Creek Campsite to Goose River – 7.4 km (4.6 miles)

*NOTE*  An additional 7.9 km (4.9 miles) is required to actually FINISH the trail and get to civilization.  This is the “mandatory approach trail”.  The hike from Goose River to find the approach trail is NOT explained well in the guide, and I recommend reading the bottom for help with navigation. 

Total Day 3 – 15.3 km (9.5 miles)

Total hiked after completion – 49.3 km (30.6 miles) TOTAL.

We made the 9.5 miles by 1 pm, crushing the day, because.. HUNGER!!!  All we could think of was, oh man – the car is right there!  9 miles away.  We can potentially get there at noon and immediately drive to eat the most food ever.  Warm showers were also on the mind.  But first, food.

We had a tough decision to make.  Low tide was scheduled for 6:51 am, we had 2 crossings to make that were 7.4 km apart, with a 4 hour window to make both.  Knowing our previous days hiking rate, and our current exhaustion level, it wasn’t looking good.  However, we had hunger on our side.  I was not about to wait until 5 pm to cross Goose River.  We were up at 5 am, and out of camp by just before 6 am.

img_7220

Crossing Goose Creek sucks.  Neither of us had water shoes, because, who has time for those.  They are too heavy for camp shoes, and I have never really needed them.  I’ve made all my river crossings to date in my boots.  THIS crossing, however, was not sandal friendly.  I immediately lost my first sandal hiking the .5 km up river to the crossing.  The mud came up to our knees.  I didn’t even bother looking for it, I was too tired.  The mosquitos were on us, the rain had started, I was barefoot, and it was only 6 am.


We made it to the crossing, a slow trickle of shallow water.  The rocks were cutting into my feet, I was ready to put on some shoes and get my hike on!  The crossing took about 20 minutes for the minimal distance, which was a little disappointing.

On the other side, however, we went beast mode.  I carry mio energy whenever I hike, which came in handy.  The hike from Goose Creek to Goose River is super easy, comparatively.

We hiked up and over to Azore Beach, it was raining, but it was still a pretty site.

We got a little worried that we weren’t going to be able to make the crossing, until we came upon 2 hikers that had just crossed it, and said the water was still below their knees.  We ran from there.  We found the river!   We found the 0 km!  It was 3 hours past low tide and the crossing was super easy.  Rock hopping.  Never got wet.  What was all this about in the book then?

  • NOTE – Well, that’s when things got tricky.  We had to find the approach trail.  We saw some yellow blazes, assumed we were going the right way and walked for a couple hundred yards until it just ended.  We ended up in deep ocean channel, that was just void of water.  There was water in the center, with sloping hills on either side filled with mud, and a high tide water mark well above our heads 20-30 feet on either sides of us.  We realized it was 3 hours past low tide, with the safe crossing gone 1 hour ago, and started to get worried.  With no more blazes visible, panick set in a little bit.

img_7226

This is pretty much the end of the blazes.  Up ahead, it diverges left and straight.  There are footprints and paths going both ways.  The correct sequence from here is to hike straight, try to keep out of the mud, and once you get to the divergence, go straight across, up the hill, and on top of that hill you will see a log bench and some rocks.  Look very carefully and you will find a poorly marked entrance to the beginning of the approach trail.  The ONLY reason we found this, was because we saw a person.  We had walked around for a good 10 minutes in the wrong direction, and then turned around to try to find our bearings again.  This is not good to do when high tide is looming.  Hope that helps!

This section is beautiful!!!  And only 7.9 km from our car!!!  Did I mention I was hungry?  What did hot food taste like?  Is there lobster in New Brunsick?  How fast can an injured person run 5 miles with a 40 lb pack?  These are all questions in my mind as I surveyed the awesome scenery.

After taking 30 minutes to find the actual damn trail, we started on it.  IT WAS A ROAD!  We hiked the 5 miles in a little under 2 hours.

The End.  Aaaaand ready for the next one.


Fundy Footpath – Day 2


Little Salmon River to Goose Creek Campsite – 16.1 km.  (10 miles)

Total 34 km (21.2 miles)

IMG_7203

Hell of a day!  We met some Canadian hikers doing the same trail last night, and camped with them.  They told us that today was the hardest section of all.  Today WAS the hardest day.  It was a serious roller coaster of steep, and I mean steep, uphills, marshes on top, steep descents to creeks, up and around inlets etc.  My knee had started aching the day before, so I was a little worried about it.  But hey, we made it.

Section 1 – Little Salmon River to Wolf Brook – 4.5 km (2.8 miles)

image1(1)

4.5 km.  2.8 miles.  For some reason, this took us roughly 3.5 hours!  This section was a rough way to start the day.  We woke up early, and got out of camp at 7 am, proudly packed up everything quick and thought we were going to make it to Azore Beach (we really wanted to stay there).  As you can see, the trail from Little Salmon River goes up an asskicker.  Being that it was only 7 am, we thought we’d beat the heat.  The humidity index went WAY up, and we found ourselves out of breath and taking off clothes near the top.  The top section was murky, swampy, something out of Vermont.   We made it to our first stop at Rapidy Brook, and we realized it took us almost 2 hours to hike the 2.5 km.  There is a really nice bridge here, and a great place to fill up water.

The trip to Wolf Brook was easier, except once again on top, there was a huge swamp.  We were both super tired but the silly talks about food and Canadian Panther Ticks made the journey a little more easy on the feet.

Wolf Brook to Telegraph Brook – 2.0 km – to Quiddy River 6.0 km (10.5 for the day – AND LUNCH!)

Every time we got down to a brook I got all excited!  We are making progress!  And I get to stop and take a long break.  By Telegraph Brook, I was beat!  Everything was hurting.  This was the extremely hard part, and I was in the middle of it.  We were both in shock at this point and sat down and took a good 20 minute break.  We ran into a couple of hikers hiking the other way, they gave us some info about the trail which wasn’t too positive, and had a nice little snack.  I started realizing this was going to be a long day!  Telegraph Brook is a pretty nice place to stop for a break, a nice pool of water.

IMG_7216

I’ll be honest, getting up and hiking after sitting down sucked.  Last thing I wanted to do.  We got to climb up and away from the ocean, back down to another brook, a steep up a mountain, and then drop a swift and very steep descent to Quiddy River.  I was in a lot of pain and in a sour mood by the time we arrived here, and we weren’t making the time I thought we would.  Quiddy River was a GREAT place to take the shoes and socks off and just relax and soak the feet.

Quiddy River to Goose Creek Campsite – 6 km (3.72 miles)  Total for the day – 16.1 km (10 miles).image1(2)

I realized we were going to get to Goose Creek at 6 pm, perfect time for a low tide crossing.  10 hours to hike 10 miles, I was not very happy with.  I felt like since it stayed light out until 10 pm, why not make it to Jim Brook or Rose Brook?  And the answer to that question, is because I zombie walked into Goose Creek, I don’t think I had enough energy to muster up my evening chores!  Getting water for instance.

After the section we just went through, this was not bad at all!  Yes, going up from Quiddy River sucked.  Just to come all the way back down to sea level again, just down the path a little bit.  In fact, I overheard the Canadians talking about walking down that section in their water shoes and skipping the uphill, because the road and ATV trails connect to the actual trail.  We should have waited for them!  The uphill was unrelentless.  The downhill part was awesome, about 2 km of easy downhill.  Unfortunately, this is when my girlfriend started getting the bad blisters.  We had duct taped her feet since her shoes weren’t really broken in when we started (rookie mistake 😉 ).  I have had great success with duct tape.  We were just really beaten down by this part, and we understood we were just going down the same hill we climbed up, only to be about .5 km away from where we started, while hiking about 3.

But those views though!

IMG_7217

The trail meandered along the beach for hours, it seemed to stretch out longer, I felt like this was all the maps fault.  We finally made it to Brandy Brook!   And then hiked the 1 km to our campsite.  Once we got there, 10 hours later, we realized… This is where we are sleeping tonight.  On the plus side, Goose Creek Campsites are dope looking!

The rest of the evening was quite calm if I remember correctly.  Same Canadian neighbors showed up, not many spots to sleep in, but we all fit.  Another bear box at this site.

Interested in your own camping experience?  Check out my lengthy gear page!

Fundy Footpath Day 1

Point Wolfe campsite to Big Salmon River – 2 hour taxi ride.  Followed by hiking from Big Salmon River to Little Salmon River – 17.9 km.

Alexi showed up at whatever time I had asked of him, I even changed the time on him last minute as I forgot that there was another time difference when we crossed over to Canada into New Brunswick.  He brought coffee, he was friendly, he told us all about the sites, and even stopped and showed us his favorite spots while telling us the history.  He tried to stop at a restaurants for world famous seafood chowder before we departed but it was closed as we asked him to leave so early.  Put him in as one of your options.  You can contact Alexei Kalinin for more information at –

Alexei

Go Fundy Тours
(506) 898-1312

He happened to be our cheapest option, and the experience was great, so just wanted to put that out there for those who are interested in taxi options.  The plan was to hike back to our car at Point Wolfe Campground (yes you can park for free).

2 of Alexis favorite spots on the way to Big Salmon River (the Western Terminus)

Now, the hike – Day 1 – Big Salmon River to Little Salmon River

17.9 km (11.12 miles)

FYI, there is available water everywhere.  Do not worry yourself with packing too much, I carried just over 1.5 liters at each water location, and never ran out.

Big Salmon River is the Western Terminus of the Fundy Footpath, and has a visitor center complete with bathrooms and a shop in case you forgot anything.  They ask for your emergency contact information, estimated date of finishing and they WILL contact you if they do not hear back from you by the time you are done.  This turned out to be a dangerous trek, and we met a couple people who were rescued from this hike the year before.  Fun!  The most important info to take away, if you do call 911, you must tell them you are in New Brunswick, as all call GPS are rerouted to Nova Scotia, and they will spend all their time searching for you there.

We signed in and she told us quick directions how to get to the trail.  I was half listening, because I believed this trail to be blazed with white blazes, which I am familiar with following having hiked the Appalachian Trail.  The entire trail has a map and guide, available for purchase at both ends of the park, since mine never arrived after I sent for it I purchased a new one here.  It breaks up the trail into sections about 4-5 km long, and is pretty descriptive.  I will reference these points in my blog.

Leaving the visitor center, we crossed the bridge and took some pictures.  This was my girl friends first backpacking trip!  And she was entirely dependent on me to not get lost…

We got lost immediately after crossing the bridge!  The trail looks like this.

IMG_7165
Pretty much after walking on a nice path that is a trail, the trail disappears.  This will happen again and again and again, throughout the entire hike.  You must guess where to go next, and sometimes the guide is helpful.

After losing all credibility in front of my girlfriend, we followed the river staying on the eastern side, up to almost the mouth of it.  Guess what?  The trail starts there, and there were no markers pointing that way.  If you want to hike this trail, cross the bridge, pretend you know what you are doing and make your way towards the ocean on the east side, and BOOM – TRAIL.  I wish someone had told me that.  Thinking back, the lady at the visitor center probably did.  Moving on,

Big Salmon River to Long Beach Brook – 4.5 km (2.79 miles). 

EASY!  Except we got lost again.  Guess what?  Those white blazes that are on the trees?  They say parts of the trail are washed out.  In Maritime Canada, that means 500 foot wide rock slides, tearing down all trees holding any blazes on them.  Where the f*ck did the trail go.  I don’t know.  You’ll find it, just look very carefully.  They have gone back and marked it, but holy hell, this trail is in bad shape. Not bad shape due to lack of maintenance, bad shape due to constant bombardment of way too much rain, slopes of 60-80 degrees, and apparently the earth caving in on itself.  I mean, look at this fun.


This was one of the easier sections however, and we were able to reach Long Beach Brook in about 1.5 hours.  There are bathrooms and benches to sit at and take a break right on the ocean.  This will be your last luxury of seeing a parking lot also.   We saw 4 hikers ahead of us just finishing their break, and we talked to some people hanging around the beach.  2 couples in their 60s that were actually rescued last year on the part we were just on.  Oh, and they told my girl friend there were bears… Jerks.  I had been lying to her up until that point.  We had a nice snack and moved on.

Long Beach to Seeley Beach 3.8 km (2.36 miles) 

Total – 8.3 km (5.15 miles)

After sitting for a while on the benches on the beach we took off.  But once again, where the EFF did the trail go???  There are no signs pointing to where the trail picked up again.  Luckily we saw the other hikers leaving the bench spots up on the pier by the parking lot.  We searched and searched, and finally we found what looked like a trail could be.  This was right next to the last bench by the ocean, a small unmarked trail leads around the corner and uphill.  There were no blazes, just pink ribbons signifying that maybe they are working on this section.  This turned out to be the trail (we did lots of back tracking to make sure).  Once we were on the trail, it was easy going again.  This section ended up being the easiest and quickest walk, we were quickly to Dragons Tooth before we knew it.  There were signs that there was blasting going on, but we made it around the dynamite, around the 500 ft rock slides that brought down every surrounding tree with it, and down to Seeley Beach.

Seeley Beach was rocky, windy, remote, a nice place to take a break.  The trail follows the beach here for about 1000 ft, before going back up into the woods.  We had lunch here.  This has one of those cross at low tide warnings.  We crossed a tiny section that was above our knees.

Seeley Beach to Cradle Brook – 4.6 km

Total to Cradle Brook – 12.9 km (8.01 miles)

From here, its stairs straight up.  The hike to Cradle Brook was tough, up to the top, marshes on top, down again, up again etc.  Usually I wouldn’t mind, but the trail was weathered as I said, steep, lots of opportunities to miss the trail etc.  We started resting every time we got to a brook, we were tired.  It was only 4 pm, and Little Salmon River was only 5 km more.

Cradle Brook to Little Salmon River – 5 km (3.1 miles)

Total – 17.9 km (11.12 miles)

We were wiped!  The trail got very steep up and over cradle brook to Little Salmon River.  This part sucked.  This 11 miles was harder than starting the Appalachian trail, more comparative to the whites, without the 4k elevation.  Just ups and downs, roots and rocks and roots and rocks.  We should probably have stopped at Cradle Brook, but it was only 4 pm(ish) and daylight literally stays until 10pm.  We’re not suckers!

We hiked the 5 painful miles, and descended rapidly to Little Salmon River, where we just came out into a basin, at low tide, and said whaaaaaaat.  Apparently you take a sharp left, hike .3 – .5 km and cross the river.  There are a bunch of trails marked blue blazes (ATV trails), don’t be fooled.  The trail is hidden in a foresty inlet, a bunch of rocks leading into an enclosure that doesn’t look like a trail at all.  This is it.  Hike up just 100 ft, and you will see a beautiful campsite, with a bear box and a privy!!!  Whaaaaat.  I didn’t think I would see a privy on this trail.  The bear box added to my girl friends fears of bears, and the Canadian hikers we met shrugged it off.

We set up camp, ate our stupid hiker dinners, listened to Canadians talk about their lives, I eventually crawled out of my tent at 8 pm to join them at the fire, consuming half a bottle of my whiskey, while my girl friend straight up passed out hard.  The fire continued well past 10 pm, as the sun was still out (seriously?), and finally I got to sleep for about 5 hours.


Fundy Footpath – Prep and beginning day 1.

01_ATgear_olivier_750x400  Get your gear first!   Amazon Outdoor Gear

The Fundy Footpath.  The largest tidal zone in the world.  A continuation of the Appalachian Trail (international Appalachian Trail).  Ocean.  All reasons I chose this hike this summer.  Also, the hike was only 30 miles, and I would be taking my girl friend on her VERY FIRST backpacking trip.  In retrospect, this was not the best hike for a first timer…  It is extremely difficult :).  She’s still with me though!

I was able to find lots of information about this hike, including various blogs and youtube videos.  Understandably, most blogs and videos complained about how rugged and tough the trail was.  Being the over-confident hiker I am, I laughed at most of what was written and wrote it off.  (I’ve hiked the 49.3 km or 3o miles in just a day before with a full pack).  I shit you not, it took me 10 hours to hike 1o miles on this trail.  I realized on day 2, they weren’t joking!  This is an intense hike.  Compared to the Appalachian trail, where you will climb a mountain, get a spectacular view, climb back down, repeat.  This was climb 1000 vertical feet in less than 1 mile, no view, immediately descend, repeat.  Getting past that part, its beautiful, remote, rugged, and most of the trail is completely destroyed by the coastal rains.  Be prepared to hang on to a lot of roots as you try to space your feet perfectly on the 6 inches of what remain of the trail.

SO, that being said, let’s get to it!  Preparing for the hike.  The hike ends (or begins) at point wolfe campground.  We decided to camp there, and get a taxi to the other end, the suspension bridge at big salmon river.  I called various sites and Alexi offered to take us for 150 Canadian.  The people at the information center were charging about 250.  If you are feeling adventurous, and lucky, we ran into a couple from Quebec that parked their car, and then waited to meet someone heading the opposite direction, giving them their car keys, and asking them to park their car for them at the opposite side!  Dang guys!  Canadians sure are polite!

The drive from Pointe Wolfe campground to big salmon river is about 2 hours.  We got there around 10 am, signed in the register and started our journey.  We quickly got lost immediately after passing the suspension bridge.  Which I will get to in my next post.  Did anyone mention it was really easy to get lost on this hike???


Caught up in the moment. Cushing, Maine

 Just a couple quick photos from the last adventure.  Ocean kayaking in Maine truly leaves you breathless and awestruck.  Just another reason to travel.


Looking towards Canada for the next trip

1313902.large Camping and the Outdoors

East Coast of Canada!  Who’s coming with me?!

5985226459_f24c6e1af3

This looks like the East Coast version of the Lost Coast Trail I hiked last summer.

Fundy-c-J-Pleau-Parcs-Canada-700x420

I have been doing some research on great trails off the East Coast, the farther north the better, and I stumbled across “The Fundy Footpath“.  It is one of the biggest tidal zones in the world, as the Atlantic Ocean sweeps into this channel called the Bay of Fundy.  The tide rises upwards of over 100 feet, and back down!  Insane.  Plus, it’s beautiful!

A new place, on the ocean, insanely beautiful, a new country, a new adventure.

fundy.jpg

If anyone has any 1st person experience with this

area, feel free to reach out!  Looks like we’ll be heading out around early July.  Now, who’s coming with me?

Looking for gear reviews?  Check out my gear page for my completed Appalachian Trail Thru hike.

-Stretch


Joshua Tree

Ya4zf

Get outside! Camping and Hiking

Deciding to camp in Joshua tree in late December was a tough one.  The park is beautiful, but the temperatures drop below freezing regularly, and you might only see highs of in the 40’s.  Having an adventurous side has its perks, so off we went.  There are lot’s of camping sites in the park itself.  White Tanks was one of my favorite and the most beautiful.  The campsites inside the park have no access to water, but do (most) have bathrooms.

This campsite has access to Arch rock, a pretty short but popular hike.  A lot of rock climbing to do around here.

Another great campsite is Jumbo Rock.  A well organized, great place for scrambling, a perfect place to camp.

Skull rock is right next to this campsite, and you could either walk to it, or drive as it’s located right off the road.  A unique pattern of wind and water erosion has lead this rock to look like a human skull.

IMG_6720

There are also campsites outside of the park, for those who didn’t book far enough ahead of time, or if you like knowing there is comfort of food and grocery stores 5 miles away.  We stayed at Black Rock Campground, near Yucca Valley, which 20 miles north of I10 on the 62.  This really was a beautiful campground, well maintained, a couple potholes, but most have been paved over since the reviews I have read.

With easy access to town, and firewood (and trust me, when camping in December in Joshua Tree, you will need A LOT), this was the perfect campsite.

If you are looking to camp in Joshua Tree in the winter, pack warm clothes, the wind will make it feel colder than it reads, make sure you bring enough water into the park, and bring a camera, there are quite a bit of stars to see out there!  🙂

It also doesn’t hurt to have a guide.
-Joshua Tree: the complete guide